> ## Documentation Index
> Fetch the complete documentation index at: https://docs.pixdeliver.com/llms.txt
> Use this file to discover all available pages before exploring further.
# Creating a gallery
> Learn how to create your first gallery in PixDeliver
 ## Overview
A gallery is where you store and share photos with your clients. Each gallery has a unique URL, can be password protected, and can hold an unlimited number of photos (within your chosen plan).
Creating a gallery is free. You only pay when you want to activate it.
***
## Step by step
### 1. Go to the dashboard
**Instructions:**
1. Log in to your PixDeliver account
2. You'll be redirected automatically to the **Dashboard**
3. Click the **Galleries** section in the menu
**Result:** You'll see an overview of your galleries.
### 2. Start creating a gallery
**Instructions:**
1. On the **Galleries** page, click the **Create gallery** button
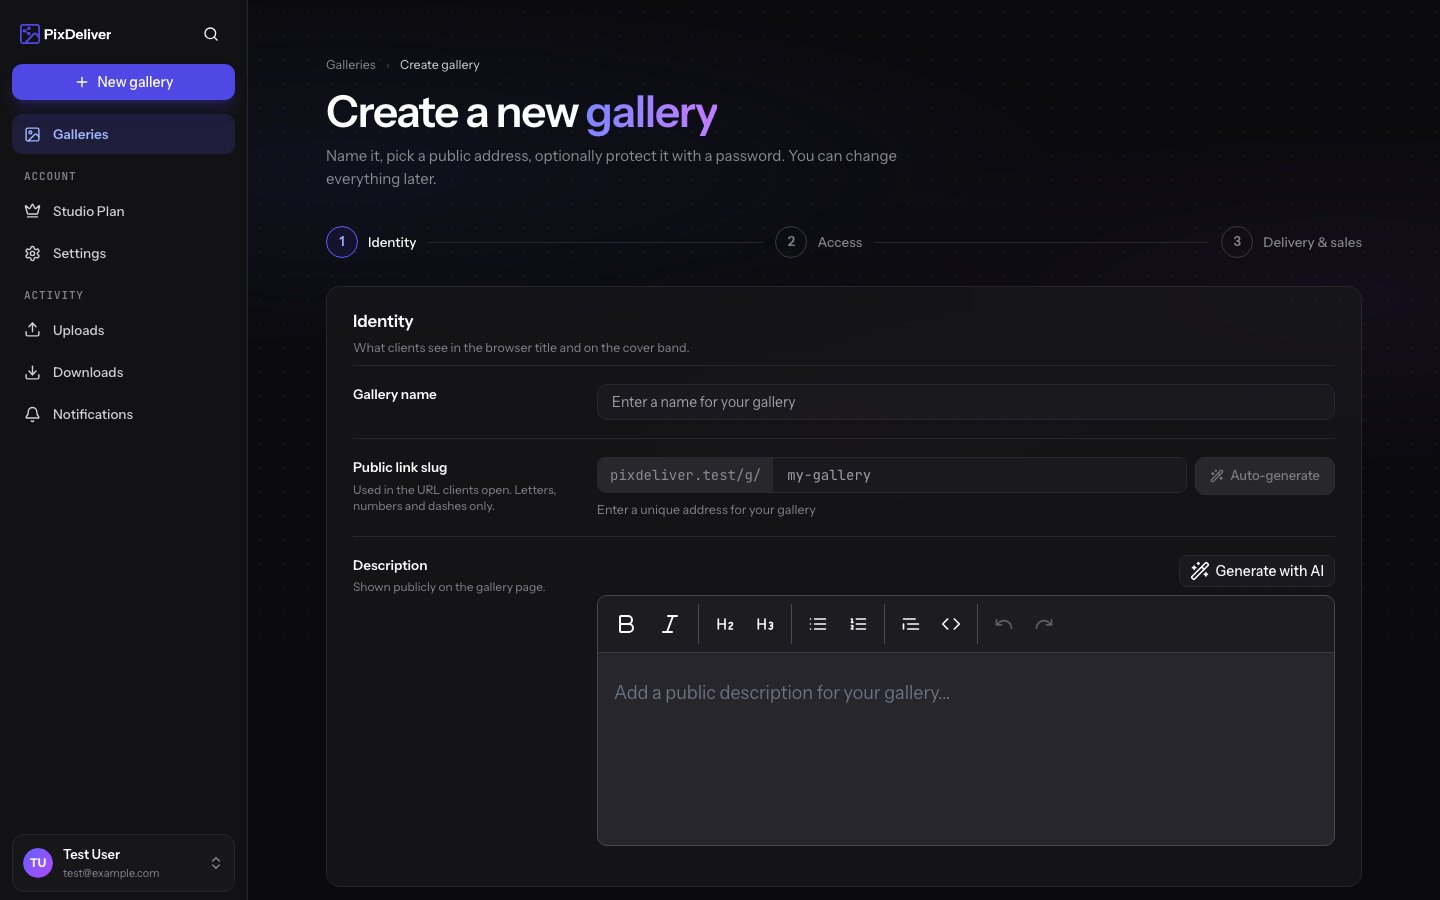
### 3. Fill in the basic information
**Instructions:**
1. **Gallery name** - Enter a descriptive name (for example, "Anna and Tomasz's Wedding" or "Kowalski Family Session")
* It will be visible to your clients
* Up to 100 characters
2. **Slug (URL)** - Enter a short, friendly address (for example, "wesele-anna-tomasz")
* Only lowercase letters, digits, and hyphens
* No accented characters
* It will be part of the gallery link
* Example: `pixdeliver.com/g/wesele-anna-tomasz`
3. **Description** (optional) - Add a short description of the gallery
* Visible to clients on the gallery page
* You can include the session date, instructions, or any extra information
**Result:** The basic gallery information is filled in.
**A good slug:**
* Describes the content (wesele-kowalskich, sesja-noworodkowa-maj-2024)
* Can be generated automatically using the button next to the "Slug" field
* Is unique within your account
### AI-generated description (optional)
Not sure what to write in the description? Next to the **Description** field you'll find a **Generate with AI** button.
**Instructions:**
1. Click **Generate with AI**
2. (Optional) enter a **short description** of the session or use one of the ready-made suggestions (such as wedding, newborn session, or portrait)
3. Click **Generate** — you'll get 3 suggested descriptions
4. Choose the one you like and click **Use selected**
5. If needed, click **Generate again** to get a new set of suggestions
**Result:** The selected description is added to the gallery's description field. You can edit it however you like before saving.
The AI builds a suggestion based on the gallery name and your short description — always review and refine the text before publishing. You'll find the same feature later in the gallery settings (if a description already exists, the **Replace** button swaps out the current text).
***
### 4. Set up password protection (optional)
**Instructions:**
1. Check the **Protect gallery with a password** option
2. In the **Password** field, enter the password you want for the gallery
3. Confirm the password in the **Confirm password** field
**Result:** The gallery will require clients to enter a password before they can view the photos.
**When is a password worth using?**
* Intimate or sensitive sessions (such as boudoir or maternity)
* Weddings, where you want to limit access to guests
* Business sessions with confidential material
* When a client requires extra privacy
You can change or remove the password later in the gallery settings. Remember to share the password with your clients along with the gallery link. If you want to keep everything fully confidential, it's a good idea to share the link and the password through separate channels — for example, the link by email and the password by text message.
***
### 5. Choose how photos are delivered (optional)
By default, a gallery is **free** — clients download the originals. If you want to **sell** photos, choose a paid mode (purchase of the entire gallery or individual photos) in the **Delivery and sales** section. You can also set the delivery mode later in the gallery settings.
A complete guide to paid modes, watermarks, and pricing: [Selling galleries](/en/delivery-and-sales/selling-galleries).
### 6. Create the gallery
**Instructions:**
1. Review all the information you entered
2. Click the **Create gallery** button
**Result:** The gallery will be created and will appear in your gallery list.
***
## Gallery statuses
Technically, every gallery can have one of three statuses:
### Unpaid
* The gallery has been created but not yet activated
* The gallery is **NOT available** publicly
* The link doesn't work for clients
* No charges are applied
### Active
* The gallery has been paid for and is active
* The photos are publicly available via the link
* Clients can browse and download photos
* The gallery is valid for 1 year from the payment date
* Statistics for views and downloads are displayed
### Expired
* A year has passed since the gallery was activated
* The gallery is no longer available publicly
* You can renew it (extend it for another year)
* 14 days after expiration, the gallery may be deleted
**Trial period:** You can create galleries, upload photos, and test all the features for free. You only pay when you want to share a gallery with clients.
***
## After creating a gallery - what's next?
Once you've created a gallery, you have a few options:
Add photos to the gallery
Change the name, slug, or password
Activate the gallery and share it with clients
Set the order and the cover photo
***
## A typical workflow
1. **Create the gallery** - Give it a name and a slug
2. **Upload photos** - Upload all the photos from the session
3. **Organize the photos** - Set the order and choose a cover photo
4. **Review the gallery** - Make sure everything looks good
5. **Pay for the gallery** - Choose a plan and pay for the gallery
6. **Share with clients** - Send the link (and the password, if set)
***
## Limits and requirements
### Gallery name
* Minimum: 3 characters
* Maximum: 100 characters
* May contain: letters (accented characters OK), digits, spaces, punctuation
* Must be unique within your account
### Slug (URL)
* Minimum: 3 characters
* Maximum: 100 characters
* Only: lowercase letters (a-z), digits (0-9), hyphens (-)
* No: spaces, accented characters, special characters
* Must be unique within your account
* Valid example: `wesele-ania-2024`
* Invalid example: `Wesele Ani_2024`
### Gallery password
* Minimum: 4 characters
* Maximum: 50 characters
* May contain any characters
* Case sensitive
***
## Tips and best practices
✅ **Recommended:**
* Use descriptive gallery names that include your clients' names or the session type
* Create slugs without dates if the gallery is meant to be "timeless"
* Add a description with instructions for the client (for example, "Download your favorite photos" or "Pick 10 photos for the album")
* Set a password for sensitive sessions
* Create the gallery before the session (you can fill in the details in advance)
* Group galleries by client or session type
❌ **Avoid:**
* Using generic names like "Gallery 1", "Test", or "New"
* Slugs that are too long or complicated
* Using accented characters in the slug (replace: ą→a, ę→e, ś→s, etc.)
* Creating galleries without a plan (think about naming first)
* Using the same password for every gallery
***
## Troubleshooting
**Problem:** The slug is already taken. **Solution:**
* Add numbers or a date (for example, `wesele-kowalskich-2024`)
* Add a month (for example, `sesja-rodzinna-maj`)
* Use a fuller name (for example, `wesele-anna-tomasz-warszawa`)
**Problem:** I can't use accented characters in the slug. **Solution:** This is a technical URL limitation. Replace accented characters:
* ą → a, ć → c, ę → e, ł → l, ń → n
* ó → o, ś → s, ź/ż → z
* Example: "Sesja Świąteczna" → "sesja-swiateczna"
**Problem:** I forgot the gallery password. **Solution:**
1. Go to the gallery settings
2. In the "Password" section you can view the current password or change it
3. Save the new password and share it with your clients
**Problem:** The gallery isn't showing up after I created it. **Solution:**
* Check the gallery status - if it's "Unpaid", the gallery isn't available publicly yet
* You need to pay for the gallery first before it's available to clients
* See: [Plans and pricing](/en/payments/plans-and-pricing)
***
## Examples of good gallery names
### Weddings
* Name: "Anna and Tomasz's Wedding"
* Slug: `wesele-anna-tomasz`
* Description: "Our shared moments from June 15, 2024. Download your favorite photos!"
### Family sessions
* Name: "Kowalski Family Session - Autumn 2024"
* Slug: `rodzina-kowalskich-jesien`
* Description: "A beautiful autumn session in the park. We hope you enjoy the photos as much as we enjoyed the session!"
### Maternity sessions
* Name: "Maternity Session - Ania"
* Slug: `ciazowa-ania-maj2024`
* Password: `ania2024` (for privacy)
* Description: "A special time of waiting for the little one"
### Events
* Name: "Tech Summit Conference 2024"
* Slug: `tech-summit-2024`
* Description: "Photos from the Tech Summit conference. Find yourself in the photos!"
***
## Related topics
* [Uploading photos](/en/managing-galleries/upload-photos) - How to add photos to a gallery
* [Gallery settings](/en/managing-galleries/gallery-settings) - How to edit a gallery after creating it
* [Plans and pricing](/en/payments/plans-and-pricing) - Information about plans and pricing and how to pay for a gallery
* [Selling galleries](/en/delivery-and-sales/selling-galleries) - Enable paid mode and sell photos to clients
* [Sharing galleries](/en/sharing/public-links) - How to send the link to clients
## Overview
A gallery is where you store and share photos with your clients. Each gallery has a unique URL, can be password protected, and can hold an unlimited number of photos (within your chosen plan).
Creating a gallery is free. You only pay when you want to activate it.
***
## Step by step
### 1. Go to the dashboard
**Instructions:**
1. Log in to your PixDeliver account
2. You'll be redirected automatically to the **Dashboard**
3. Click the **Galleries** section in the menu
**Result:** You'll see an overview of your galleries.
### 2. Start creating a gallery
**Instructions:**
1. On the **Galleries** page, click the **Create gallery** button
### 3. Fill in the basic information
**Instructions:**
1. **Gallery name** - Enter a descriptive name (for example, "Anna and Tomasz's Wedding" or "Kowalski Family Session")
* It will be visible to your clients
* Up to 100 characters
2. **Slug (URL)** - Enter a short, friendly address (for example, "wesele-anna-tomasz")
* Only lowercase letters, digits, and hyphens
* No accented characters
* It will be part of the gallery link
* Example: `pixdeliver.com/g/wesele-anna-tomasz`
3. **Description** (optional) - Add a short description of the gallery
* Visible to clients on the gallery page
* You can include the session date, instructions, or any extra information
**Result:** The basic gallery information is filled in.
**A good slug:**
* Describes the content (wesele-kowalskich, sesja-noworodkowa-maj-2024)
* Can be generated automatically using the button next to the "Slug" field
* Is unique within your account
### AI-generated description (optional)
Not sure what to write in the description? Next to the **Description** field you'll find a **Generate with AI** button.
**Instructions:**
1. Click **Generate with AI**
2. (Optional) enter a **short description** of the session or use one of the ready-made suggestions (such as wedding, newborn session, or portrait)
3. Click **Generate** — you'll get 3 suggested descriptions
4. Choose the one you like and click **Use selected**
5. If needed, click **Generate again** to get a new set of suggestions
**Result:** The selected description is added to the gallery's description field. You can edit it however you like before saving.
The AI builds a suggestion based on the gallery name and your short description — always review and refine the text before publishing. You'll find the same feature later in the gallery settings (if a description already exists, the **Replace** button swaps out the current text).
***
### 4. Set up password protection (optional)
**Instructions:**
1. Check the **Protect gallery with a password** option
2. In the **Password** field, enter the password you want for the gallery
3. Confirm the password in the **Confirm password** field
**Result:** The gallery will require clients to enter a password before they can view the photos.
**When is a password worth using?**
* Intimate or sensitive sessions (such as boudoir or maternity)
* Weddings, where you want to limit access to guests
* Business sessions with confidential material
* When a client requires extra privacy
You can change or remove the password later in the gallery settings. Remember to share the password with your clients along with the gallery link. If you want to keep everything fully confidential, it's a good idea to share the link and the password through separate channels — for example, the link by email and the password by text message.
***
### 5. Choose how photos are delivered (optional)
By default, a gallery is **free** — clients download the originals. If you want to **sell** photos, choose a paid mode (purchase of the entire gallery or individual photos) in the **Delivery and sales** section. You can also set the delivery mode later in the gallery settings.
A complete guide to paid modes, watermarks, and pricing: [Selling galleries](/en/delivery-and-sales/selling-galleries).
### 6. Create the gallery
**Instructions:**
1. Review all the information you entered
2. Click the **Create gallery** button
**Result:** The gallery will be created and will appear in your gallery list.
***
## Gallery statuses
Technically, every gallery can have one of three statuses:
### Unpaid
* The gallery has been created but not yet activated
* The gallery is **NOT available** publicly
* The link doesn't work for clients
* No charges are applied
### Active
* The gallery has been paid for and is active
* The photos are publicly available via the link
* Clients can browse and download photos
* The gallery is valid for 1 year from the payment date
* Statistics for views and downloads are displayed
### Expired
* A year has passed since the gallery was activated
* The gallery is no longer available publicly
* You can renew it (extend it for another year)
* 14 days after expiration, the gallery may be deleted
**Trial period:** You can create galleries, upload photos, and test all the features for free. You only pay when you want to share a gallery with clients.
***
## After creating a gallery - what's next?
Once you've created a gallery, you have a few options:
Add photos to the gallery
Change the name, slug, or password
Activate the gallery and share it with clients
Set the order and the cover photo
***
## A typical workflow
1. **Create the gallery** - Give it a name and a slug
2. **Upload photos** - Upload all the photos from the session
3. **Organize the photos** - Set the order and choose a cover photo
4. **Review the gallery** - Make sure everything looks good
5. **Pay for the gallery** - Choose a plan and pay for the gallery
6. **Share with clients** - Send the link (and the password, if set)
***
## Limits and requirements
### Gallery name
* Minimum: 3 characters
* Maximum: 100 characters
* May contain: letters (accented characters OK), digits, spaces, punctuation
* Must be unique within your account
### Slug (URL)
* Minimum: 3 characters
* Maximum: 100 characters
* Only: lowercase letters (a-z), digits (0-9), hyphens (-)
* No: spaces, accented characters, special characters
* Must be unique within your account
* Valid example: `wesele-ania-2024`
* Invalid example: `Wesele Ani_2024`
### Gallery password
* Minimum: 4 characters
* Maximum: 50 characters
* May contain any characters
* Case sensitive
***
## Tips and best practices
✅ **Recommended:**
* Use descriptive gallery names that include your clients' names or the session type
* Create slugs without dates if the gallery is meant to be "timeless"
* Add a description with instructions for the client (for example, "Download your favorite photos" or "Pick 10 photos for the album")
* Set a password for sensitive sessions
* Create the gallery before the session (you can fill in the details in advance)
* Group galleries by client or session type
❌ **Avoid:**
* Using generic names like "Gallery 1", "Test", or "New"
* Slugs that are too long or complicated
* Using accented characters in the slug (replace: ą→a, ę→e, ś→s, etc.)
* Creating galleries without a plan (think about naming first)
* Using the same password for every gallery
***
## Troubleshooting
**Problem:** The slug is already taken. **Solution:**
* Add numbers or a date (for example, `wesele-kowalskich-2024`)
* Add a month (for example, `sesja-rodzinna-maj`)
* Use a fuller name (for example, `wesele-anna-tomasz-warszawa`)
**Problem:** I can't use accented characters in the slug. **Solution:** This is a technical URL limitation. Replace accented characters:
* ą → a, ć → c, ę → e, ł → l, ń → n
* ó → o, ś → s, ź/ż → z
* Example: "Sesja Świąteczna" → "sesja-swiateczna"
**Problem:** I forgot the gallery password. **Solution:**
1. Go to the gallery settings
2. In the "Password" section you can view the current password or change it
3. Save the new password and share it with your clients
**Problem:** The gallery isn't showing up after I created it. **Solution:**
* Check the gallery status - if it's "Unpaid", the gallery isn't available publicly yet
* You need to pay for the gallery first before it's available to clients
* See: [Plans and pricing](/en/payments/plans-and-pricing)
***
## Examples of good gallery names
### Weddings
* Name: "Anna and Tomasz's Wedding"
* Slug: `wesele-anna-tomasz`
* Description: "Our shared moments from June 15, 2024. Download your favorite photos!"
### Family sessions
* Name: "Kowalski Family Session - Autumn 2024"
* Slug: `rodzina-kowalskich-jesien`
* Description: "A beautiful autumn session in the park. We hope you enjoy the photos as much as we enjoyed the session!"
### Maternity sessions
* Name: "Maternity Session - Ania"
* Slug: `ciazowa-ania-maj2024`
* Password: `ania2024` (for privacy)
* Description: "A special time of waiting for the little one"
### Events
* Name: "Tech Summit Conference 2024"
* Slug: `tech-summit-2024`
* Description: "Photos from the Tech Summit conference. Find yourself in the photos!"
***
## Related topics
* [Uploading photos](/en/managing-galleries/upload-photos) - How to add photos to a gallery
* [Gallery settings](/en/managing-galleries/gallery-settings) - How to edit a gallery after creating it
* [Plans and pricing](/en/payments/plans-and-pricing) - Information about plans and pricing and how to pay for a gallery
* [Selling galleries](/en/delivery-and-sales/selling-galleries) - Enable paid mode and sell photos to clients
* [Sharing galleries](/en/sharing/public-links) - How to send the link to clients