> ## Documentation Index
> Fetch the complete documentation index at: https://docs.pixdeliver.com/llms.txt
> Use this file to discover all available pages before exploring further.
# Uploading photos
> Learn how to add photos to a gallery in PixDeliver
 ## Overview
PixDeliver lets you upload high-quality photos to a gallery using a simple drag-and-drop interface. The system automatically processes your photos, creating optimal versions for viewing and downloading while preserving the originals.
***
## Step by step
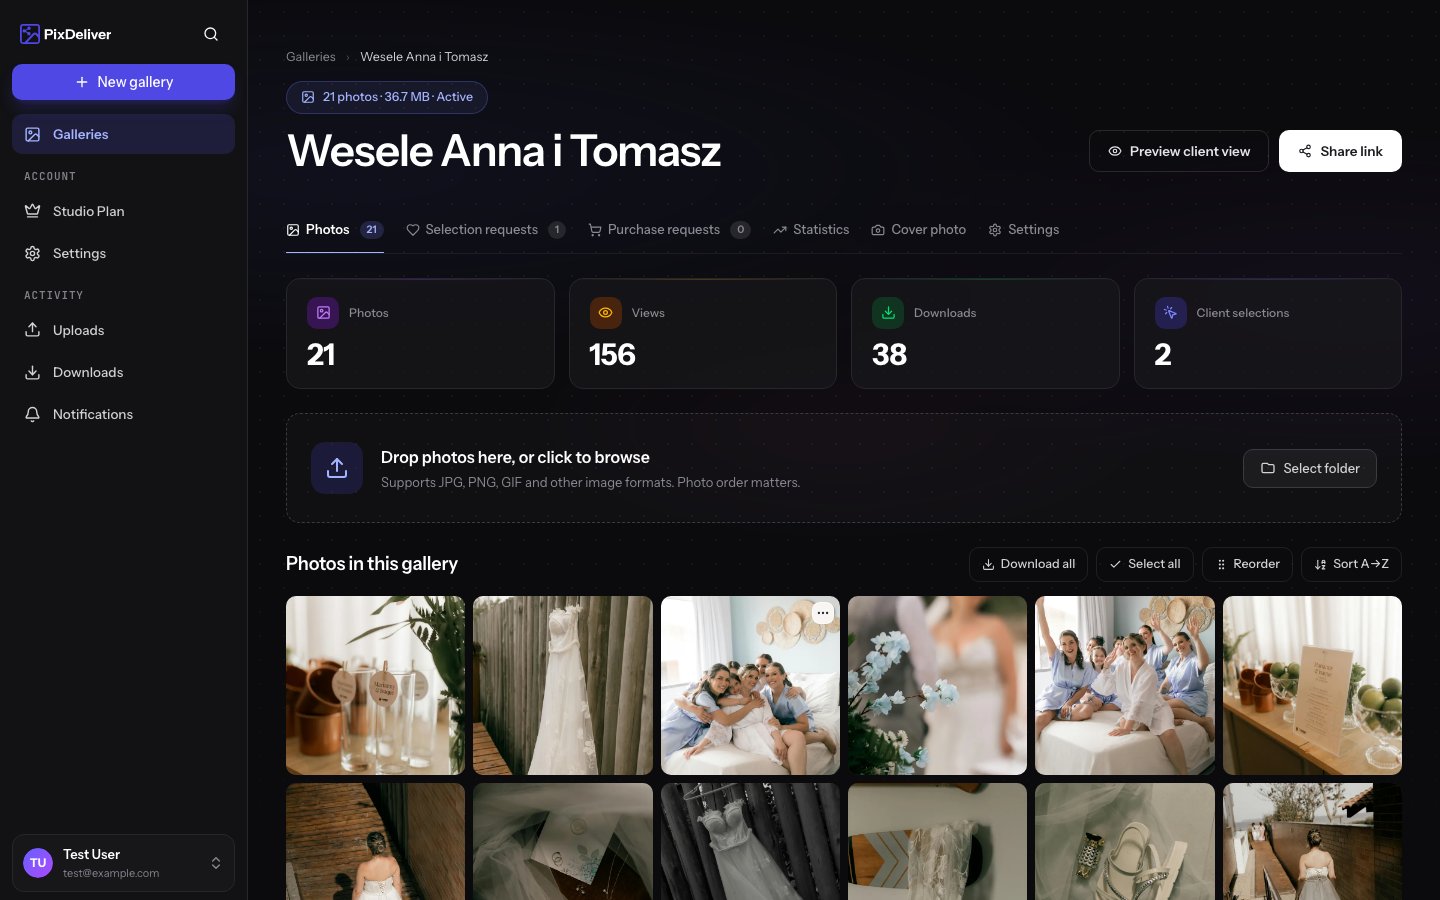
### 1. Open the gallery
**Instructions:**
1. Log in to PixDeliver
2. Go to the **Galleries** tab
3. Find the gallery you want to add photos to and click it
**Result:** You'll see the gallery page with a tab for uploading photos.
***
### 2. Start uploading
**Instructions:**
1. Click the **Upload photos** or **Add photos** button
2. A file picker window will open
**Alternative method (drag & drop):**
1. Find the photos on your computer in your file explorer
2. Drag them directly onto the gallery page in your browser
3. Drop them in the designated area
The order in which you add photos matters - the photos in the gallery will be arranged in the same order they were added.
**Drag and drop** is the fastest method! You can drag an entire folder of photos directly from your file explorer.
***
### 3. Choose the photos to upload
**Instructions:**
1. In the file picker, navigate to the folder with your photos
2. Select the photos:
* **A single photo**: Click the file
* **Multiple photos**: Hold `Ctrl` (Windows) or `Cmd` (Mac) and click each photo
* **All photos**: Press `Ctrl+A` (Windows) or `Cmd+A` (Mac)
3. Click **Open** or **Select**
**Result:** The selected photos will be added to the upload queue.
***
### 4. Monitor the upload progress
**Instructions:**
1. Watch the progress bar for each photo
2. You'll see:
* The file name
* The file size
* The upload percentage
* The status: "Uploading...", "Processing...", "Done"
**Result:** You can track which photos have already been uploaded and which are still in progress.
**Don't close your browser** while photos are uploading. If you accidentally close the tab, the upload will be interrupted and you'll have to resume it.
***
### 5. Wait for processing
After your photos are uploaded, the system processes them automatically:
**What happens:**
1. **Upload** - The photo is sent to the server
2. **Saving the original** - The original file is safely stored
3. **Orientation correction** - Automatic rotation correction based on EXIF data
4. **Thumbnail generation** - A 900×900 WebP version is created for viewing as a thumbnail
5. **Compressed version generation** - A 3840×3840 WebP version is created for the large preview
6. **Finalization** - The photo is ready and visible in the gallery
**Result:** The photos will appear in the gallery and be available for viewing.
Processing time depends on the file size. It usually takes anywhere from a few to a dozen or so seconds per photo. Processing happens on the server, so you don't need to keep your browser open for it.
***
## Formats and limits
### Supported formats
PixDeliver supports all the popular photo formats:
✅ **Recommended formats:**
* **JPEG / JPG (the most commonly used)**
* PNG (for images with transparency)
* WebP (a modern, compressed format, though it may be incompatible with some devices)
The system automatically converts all formats to WebP for optimal quality and loading speed. The original photos are available for download by both your clients and you. The original photo is always the one that gets downloaded.
### Size limits
* **Maximum size for a single photo:** 30 MB
* **Per-upload limit:** None (you can upload hundreds of photos at once)
* **Gallery limit:**
* Small gallery plan: 3 GB total
* Large gallery plan: No limit
If a photo is larger than 30 MB, you'll need to reduce its size before uploading. Use a photo editing program or lower the quality/resolution.
***
## Photo versions
To ensure the best photo-viewing experience, PixDeliver uses techniques familiar from popular image storage apps and automatically creates three versions of each photo:
### 1. Original
* Stored exactly as it was uploaded
* No compression, no quality changes
* Used when clients download the "original"
* Not displayed in the browser
### 2. Thumbnail
* Size: 900×900 pixels
* Format: WebP
* Used for: Displaying in the gallery grid
* Quality: High, optimized for fast loading
### 3. Compressed version
* Size: 3840×3840 pixels (4K)
* Format: WebP
* Used for: full-screen preview
* Quality: Very high, but with a smaller file size than the original
***
## Automatic corrections
### Orientation correction
PixDeliver automatically detects and corrects photo orientation based on EXIF data:
* Portrait photos are displayed in portrait
* Landscape photos are displayed in landscape
* Rotated photos are straightened automatically
You don't need to manually rotate photos before uploading.
***
## Monitoring failed conversions
Sometimes processing a photo can fail (a corrupted file, an unsupported format, a technical issue).
### Photo conversion errors
The system automatically retries converting files for up to a dozen or so minutes. If a photo still hasn't been processed after that time, make sure it isn't corrupted.
### Troubleshooting
**Instructions:**
1. Check whether the files are corrupted
2. Make sure the format is supported
3. Reduce the file size if it exceeds 30 MB
4. Upload the photos again
**Result:** The correct photos will be processed and added to the gallery.
The system sends a notification when it detects a failed conversion.
***
## Tips and best practices
✅ **Recommended:**
* Upload photos in high quality (ideally exported from Lightroom/Capture One)
* Use JPEG with 90-95% quality for the optimal quality/size balance
* Upload all photos at once (faster than one at a time)
* Use a fast internet connection (ideally wired)
* Process your photos before uploading (color correction, cropping)
* Name files in an organized way (for example, 001.jpg, 002.jpg, etc.)
❌ **Avoid:**
* Uploading low-quality or small photos
* Uploading the same photos multiple times
* Closing your browser during upload
* Uploading photos over slow WiFi
* Uploading RAW files (export to JPEG first)
* Uploading photos larger than 30 MB without compressing them first
***
## Optimizing before upload
### Exporting from Lightroom
Recommended export settings:
* **Format:** JPEG
* **Quality:** 90-95%
* **Resolution:** Longer edge of 4000-6000 pixels
* **Color space:** sRGB
* **Sharpening:** For screen, standard
* **Metadata:** All (or selected)
### Exporting from Capture One
Recommended settings:
* **Format:** JPEG
* **Quality:** 95%
* **Resolution:** 4000-6000 pixels (longer edge)
* **ICC Profile:** sRGB IEC61966-2.1
* **Sharpening:** Medium
### Exporting from Photoshop
* **File** → **Export** → **Export As**
* **Format:** JPEG
* **Quality:** 80-90%
* **Color profile:** Convert to sRGB
**Why sRGB?** It's the standard color space for displaying images on the web. Adobe RGB or ProPhoto RGB may look washed out in browsers on standard monitors.
***
## Troubleshooting
**Problem:** Uploading is taking a very long time. **Solution:**
* Check your internet connection speed
* Use a wired connection instead of WiFi
* Reduce the number of photos uploaded at once
**Problem:** A photo was rejected (it exceeds 30 MB). **Solution:**
* Lower the export quality to 85-90%
* Reduce the resolution (for example, to a 5000-pixel longer edge)
* Use compression in a graphics program
**Problem:** A photo is rotated incorrectly. **Solution:**
* Rotate the photo in a graphics program
* Save it with the correct EXIF orientation data
* Upload it again
**Problem:** Photo conversion failed. **Solution:**
* Check whether the file is corrupted (open it in a graphics program)
* Make sure the format is supported
* Try re-exporting the photo from your editing program
**Problem:** The photos have the wrong colors after uploading. **Solution:**
* Make sure you're exporting in the sRGB profile
* Check the export settings in your editing program
* Don't use Adobe RGB or ProPhoto RGB
***
## After uploading photos
Once the upload is complete:
Set the order and add a cover photo
See how the gallery looks to clients
Activate the gallery and share it with clients
Let clients pick their favorite photos
***
## Related topics
* [Creating a gallery](/en/managing-galleries/create-gallery) - How to create a new gallery
* [Organizing photos](/en/managing-galleries/organize-photos) - How to set the photo order
* [Plans and pricing](/en/payments/plans-and-pricing) - Check the storage limits for each plan
* [Gallery settings](/en/managing-galleries/gallery-settings) - Editing a gallery after uploading
## Overview
PixDeliver lets you upload high-quality photos to a gallery using a simple drag-and-drop interface. The system automatically processes your photos, creating optimal versions for viewing and downloading while preserving the originals.
***
## Step by step
### 1. Open the gallery
**Instructions:**
1. Log in to PixDeliver
2. Go to the **Galleries** tab
3. Find the gallery you want to add photos to and click it
**Result:** You'll see the gallery page with a tab for uploading photos.
***
### 2. Start uploading
**Instructions:**
1. Click the **Upload photos** or **Add photos** button
2. A file picker window will open
**Alternative method (drag & drop):**
1. Find the photos on your computer in your file explorer
2. Drag them directly onto the gallery page in your browser
3. Drop them in the designated area
The order in which you add photos matters - the photos in the gallery will be arranged in the same order they were added.
**Drag and drop** is the fastest method! You can drag an entire folder of photos directly from your file explorer.
***
### 3. Choose the photos to upload
**Instructions:**
1. In the file picker, navigate to the folder with your photos
2. Select the photos:
* **A single photo**: Click the file
* **Multiple photos**: Hold `Ctrl` (Windows) or `Cmd` (Mac) and click each photo
* **All photos**: Press `Ctrl+A` (Windows) or `Cmd+A` (Mac)
3. Click **Open** or **Select**
**Result:** The selected photos will be added to the upload queue.
***
### 4. Monitor the upload progress
**Instructions:**
1. Watch the progress bar for each photo
2. You'll see:
* The file name
* The file size
* The upload percentage
* The status: "Uploading...", "Processing...", "Done"
**Result:** You can track which photos have already been uploaded and which are still in progress.
**Don't close your browser** while photos are uploading. If you accidentally close the tab, the upload will be interrupted and you'll have to resume it.
***
### 5. Wait for processing
After your photos are uploaded, the system processes them automatically:
**What happens:**
1. **Upload** - The photo is sent to the server
2. **Saving the original** - The original file is safely stored
3. **Orientation correction** - Automatic rotation correction based on EXIF data
4. **Thumbnail generation** - A 900×900 WebP version is created for viewing as a thumbnail
5. **Compressed version generation** - A 3840×3840 WebP version is created for the large preview
6. **Finalization** - The photo is ready and visible in the gallery
**Result:** The photos will appear in the gallery and be available for viewing.
Processing time depends on the file size. It usually takes anywhere from a few to a dozen or so seconds per photo. Processing happens on the server, so you don't need to keep your browser open for it.
***
## Formats and limits
### Supported formats
PixDeliver supports all the popular photo formats:
✅ **Recommended formats:**
* **JPEG / JPG (the most commonly used)**
* PNG (for images with transparency)
* WebP (a modern, compressed format, though it may be incompatible with some devices)
The system automatically converts all formats to WebP for optimal quality and loading speed. The original photos are available for download by both your clients and you. The original photo is always the one that gets downloaded.
### Size limits
* **Maximum size for a single photo:** 30 MB
* **Per-upload limit:** None (you can upload hundreds of photos at once)
* **Gallery limit:**
* Small gallery plan: 3 GB total
* Large gallery plan: No limit
If a photo is larger than 30 MB, you'll need to reduce its size before uploading. Use a photo editing program or lower the quality/resolution.
***
## Photo versions
To ensure the best photo-viewing experience, PixDeliver uses techniques familiar from popular image storage apps and automatically creates three versions of each photo:
### 1. Original
* Stored exactly as it was uploaded
* No compression, no quality changes
* Used when clients download the "original"
* Not displayed in the browser
### 2. Thumbnail
* Size: 900×900 pixels
* Format: WebP
* Used for: Displaying in the gallery grid
* Quality: High, optimized for fast loading
### 3. Compressed version
* Size: 3840×3840 pixels (4K)
* Format: WebP
* Used for: full-screen preview
* Quality: Very high, but with a smaller file size than the original
***
## Automatic corrections
### Orientation correction
PixDeliver automatically detects and corrects photo orientation based on EXIF data:
* Portrait photos are displayed in portrait
* Landscape photos are displayed in landscape
* Rotated photos are straightened automatically
You don't need to manually rotate photos before uploading.
***
## Monitoring failed conversions
Sometimes processing a photo can fail (a corrupted file, an unsupported format, a technical issue).
### Photo conversion errors
The system automatically retries converting files for up to a dozen or so minutes. If a photo still hasn't been processed after that time, make sure it isn't corrupted.
### Troubleshooting
**Instructions:**
1. Check whether the files are corrupted
2. Make sure the format is supported
3. Reduce the file size if it exceeds 30 MB
4. Upload the photos again
**Result:** The correct photos will be processed and added to the gallery.
The system sends a notification when it detects a failed conversion.
***
## Tips and best practices
✅ **Recommended:**
* Upload photos in high quality (ideally exported from Lightroom/Capture One)
* Use JPEG with 90-95% quality for the optimal quality/size balance
* Upload all photos at once (faster than one at a time)
* Use a fast internet connection (ideally wired)
* Process your photos before uploading (color correction, cropping)
* Name files in an organized way (for example, 001.jpg, 002.jpg, etc.)
❌ **Avoid:**
* Uploading low-quality or small photos
* Uploading the same photos multiple times
* Closing your browser during upload
* Uploading photos over slow WiFi
* Uploading RAW files (export to JPEG first)
* Uploading photos larger than 30 MB without compressing them first
***
## Optimizing before upload
### Exporting from Lightroom
Recommended export settings:
* **Format:** JPEG
* **Quality:** 90-95%
* **Resolution:** Longer edge of 4000-6000 pixels
* **Color space:** sRGB
* **Sharpening:** For screen, standard
* **Metadata:** All (or selected)
### Exporting from Capture One
Recommended settings:
* **Format:** JPEG
* **Quality:** 95%
* **Resolution:** 4000-6000 pixels (longer edge)
* **ICC Profile:** sRGB IEC61966-2.1
* **Sharpening:** Medium
### Exporting from Photoshop
* **File** → **Export** → **Export As**
* **Format:** JPEG
* **Quality:** 80-90%
* **Color profile:** Convert to sRGB
**Why sRGB?** It's the standard color space for displaying images on the web. Adobe RGB or ProPhoto RGB may look washed out in browsers on standard monitors.
***
## Troubleshooting
**Problem:** Uploading is taking a very long time. **Solution:**
* Check your internet connection speed
* Use a wired connection instead of WiFi
* Reduce the number of photos uploaded at once
**Problem:** A photo was rejected (it exceeds 30 MB). **Solution:**
* Lower the export quality to 85-90%
* Reduce the resolution (for example, to a 5000-pixel longer edge)
* Use compression in a graphics program
**Problem:** A photo is rotated incorrectly. **Solution:**
* Rotate the photo in a graphics program
* Save it with the correct EXIF orientation data
* Upload it again
**Problem:** Photo conversion failed. **Solution:**
* Check whether the file is corrupted (open it in a graphics program)
* Make sure the format is supported
* Try re-exporting the photo from your editing program
**Problem:** The photos have the wrong colors after uploading. **Solution:**
* Make sure you're exporting in the sRGB profile
* Check the export settings in your editing program
* Don't use Adobe RGB or ProPhoto RGB
***
## After uploading photos
Once the upload is complete:
Set the order and add a cover photo
See how the gallery looks to clients
Activate the gallery and share it with clients
Let clients pick their favorite photos
***
## Related topics
* [Creating a gallery](/en/managing-galleries/create-gallery) - How to create a new gallery
* [Organizing photos](/en/managing-galleries/organize-photos) - How to set the photo order
* [Plans and pricing](/en/payments/plans-and-pricing) - Check the storage limits for each plan
* [Gallery settings](/en/managing-galleries/gallery-settings) - Editing a gallery after uploading