> ## Documentation Index
> Fetch the complete documentation index at: https://docs.pixdeliver.com/llms.txt
> Use this file to discover all available pages before exploring further.
# Managing submissions
> Learn how to review and manage photo selections from your clients
 ## Overview
After a client submits a selection form, you receive a submission containing the chosen photos, plus the client's name and email. You can review all submissions, download the chosen photos, and manage them from the panel.
***
## Accessing submissions
**Instructions:**
1. Sign in to PixDeliver
2. Go to the **Dashboard**
3. Open the gallery
4. Click the **Selection requests** tab
5. Find the selection request in the list
6. Click the selection request's name or the **View submissions** button
**Result:** You'll see a list of all submissions for that selection request.
***
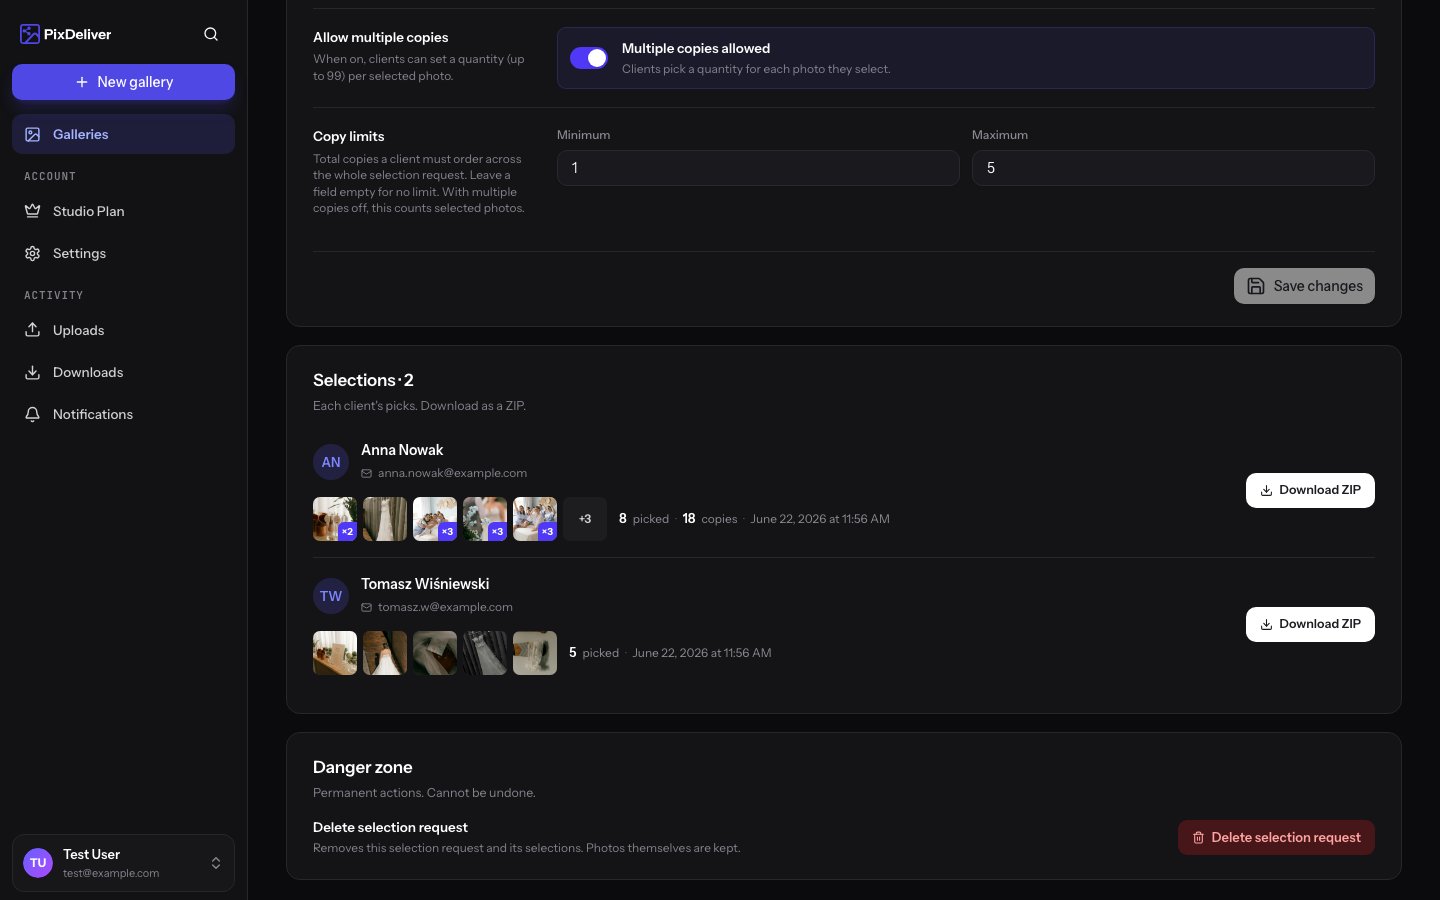
## The submissions list
### What you see in the list
For each submission you'll see:
**Basic information:**
* **Client's name** - provided in the form
* **Client's email** - the email address
* **Date and time** - when the form was submitted
* **Number of selected photos** - how many photos the client marked
**Actions:**
* **View details** - open the full preview of the selection
* **Download photos** - download the selected photos as a ZIP
* **Delete** - delete the submission
Submissions are sorted from newest to oldest. The most recent submissions are at the top of the list.
***
## Reviewing a submission
### Submission details
**Instructions:**
1. In the submissions list, click **View details**
2. A view with the full information opens
**What you'll see:**
**Client data:**
* Full name
* Email address
* Date and time of submission
**Selected photos:**
* Thumbnails of all the marked photos
* The number of selected photos
* File names
* The option to preview at full size (click a thumbnail)
**Actions:**
* Download all selected photos (ZIP)
* Download an individual photo
* Open a photo at full size
* Delete the submission
***
## Downloading the selected photos
### Download all as a ZIP
**Instructions:**
1. Open the submission details
2. Click the **Download selected photos (ZIP)** button
3. The system generates a ZIP archive (this may take a few seconds)
4. The archive downloads automatically
**What the archive contains:**
* All the photos chosen by the client
* In the compressed version (3840×3840 WebP)
* File names the same as the originals
* Format: `selection-[client-name]-[date].zip`
**Handy for producing the album:** Download the ZIP and you have all the photos chosen by the client in one place right away!
### Download an individual photo
**Instructions:**
1. In the submission preview, hover over a photo thumbnail
2. Click the **download** icon or right-click → **Save image as**
3. The photo downloads
***
## Notifications for new submissions
### Notification email
When a client submits a selection, you automatically receive an email:
**Subject:** "New photo selection from \[Name]"
**Content:**
```
A client has submitted a photo selection!
Client data:
Name: Anna Kowalska
Email: anna@example.com
Gallery: Anna & Tomek's Wedding
Selection: Choosing for the wedding album
Number of selected photos: 78
Submission date: May 15, 2024, 2:32 PM
[Button: View the selection in the panel]
```
### Turning off notifications
If you don't want to receive emails about submissions:
**Instructions:**
1. Go to **Settings** → **Notifications**
2. Uncheck **New photo selections**
3. Click **Save**
**Result:** You won't receive emails, but submissions will still be visible in the panel.
***
## Comparing submissions
### Multiple submissions from different people
If you've sent the form to multiple people (for example, a couple, or parents), you can compare their selections:
**Instructions:**
1. Open the submissions list
2. Click the first submission → **View details** → open it in a new tab
3. Click the second submission → **View details** → open it in a new tab
4. Switch between the tabs to compare
**Result:** You can see which photos each person chose.
### Finding shared choices
**Manual method:**
1. Note the numbers/names of the photos from the first submission
2. Compare them with the photos from the second submission
3. Mark the ones that repeat
**Example:**
* The bride chose: photos 1, 5, 7, 12, 15, 20
* The groom chose: photos 1, 7, 15, 18, 22, 25
* Shared: photos 1, 7, 15
***
## Multiple submissions from the same person
A client may fill in the form several times (for example, they changed their mind).
### Which submission should you use?
**The newest is usually the final one:**
* The list is sorted newest first
* The client probably changed their mind and sent a new selection
* Use the most recent submission
**Ask the client if in doubt:**
```
Hi Anna!
I received two submissions with photo selections:
- May 15, 2:32 PM - 78 photos
- May 16, 10:15 AM - 80 photos
Which one is final? 😊
Best regards!
```
***
## Exporting submission data
### List of selected photos (file names)
**Instructions:**
1. Open the submission details
2. Copy the file names of the selected photos
3. Paste them into Excel, a text editor, or another tool
**Example:**
```
IMG_0001.jpg
IMG_0005.jpg
IMG_0007.jpg
IMG_0012.jpg
...
```
**Use cases:**
* A list for the print lab
* Import into Lightroom (a collection)
* Documentation for the client
* Your own notes
***
## Deleting submissions
### When should you delete submissions?
✅ **Recommended:**
* The client sent multiple submissions and you've confirmed which one is final (delete the old ones)
* A test submission (one you sent yourself to check)
* A submission from the wrong person (accidental)
* After the project is finished and you no longer need the data
❌ **Don't delete:**
* Submissions that may still be needed
* Before downloading the photos/data
* If the project isn't closed
### How to delete a submission
**Instructions:**
1. In the submissions list, find the submission to delete
2. Click **Delete** or the trash icon
3. Confirm the deletion in the dialog
**Result:** The submission is permanently deleted.
**Deletion is irreversible!** Before deleting, make sure you have a copy of the data (downloaded photos, saved file names).
***
## Selection statistics
### Summary
In the selection view you'll see basic statistics:
**Number of submissions:**
* How many people submitted a selection
* Example: "Submissions: 3"
**Latest submission:**
* The date and time of the most recent submission
* Example: "Latest: May 16, 10:15 AM"
**Status:**
* Active / Inactive
* The expiration date (if set)
***
## A submissions workflow
### A typical process - Wedding album
1. **Creating a selection request**
* Title: "Choosing for the wedding album"
* Description: "Choose 80 photos"
* Deadline: May 31
2. **Sending the link**
* An email to the couple with the link and instructions
* A reminder a week before the deadline
3. **Receiving submissions**
* The bride submits a selection (78 photos) - May 25
* The groom submits a selection (80 photos) - May 27
* The bride submits a new selection (80 photos) - May 28
4. **Reviewing and comparing**
* You open the bride's latest submission (May 28, 80 photos)
* You open the groom's submission (May 27, 80 photos)
* You compare the selections
5. **Contacting the clients**
* You ask whether they have a shared selection or need your help
* You settle on the final list of 80 photos
6. **Downloading the photos**
* You download the final photos as a ZIP
* You start producing the album
7. **Closing the project**
* Once finished, you can delete the unneeded submissions (keeping the final one for your records)
***
## Integrating with a photographer's workflow
### Lightroom
**Creating a collection from the selected photos:**
1. Download the ZIP with the selected photos
2. Extract the archive
3. In Lightroom, create a new collection "Client's selection - \[Name]"
4. Drag the selected photos into the collection
5. Work only on those photos (retouching, export, etc.)
### Capture One
**A similar process:**
1. Download the selected photos
2. Create a new album "Selection - \[Name]"
3. Import the photos or mark the existing ones as selected
4. Export/retouch only the selected ones
### Excel / Google Sheets
**Managing orders:**
Create a sheet with columns:
```
| Client | Submission date | Number of photos | Status | Notes |
| Anna K | 2024-05-28 | 80 | In production | Premium album |
| Tomek N | 2024-05-27 | 80 | Waiting | Compare with Anna's selection |
```
***
## Tips and best practices
✅ **Recommended:**
* Download the photos right after receiving a submission
* Keep a copy of the submission (a screenshot or an export of the file names)
* Compare submissions if you have several from different people
* Ask clients to confirm the final selection
* Use the latest submission if the client sent several
* Respond to submissions quickly (a confirmation of receipt)
* Only delete unneeded/test submissions
❌ **Avoid:**
* Relying on memory alone (download and save!)
* Deleting submissions before the project is finished
* Ignoring multiple submissions from the same person (ask!)
* Assuming the first submission is final
* Losing track of submission information
***
## Troubleshooting
**Problem:** I don't see any submissions, even though the client submitted a selection
**Solution:**
1. Check the SPAM folder in your email - the notification may have ended up there
2. Refresh the page in the panel (Ctrl+F5)
3. Check that you're in the right gallery and selection
4. Ask the client for a screenshot confirming the submission
5. Ask the client whether they filled in the form all the way (clicked "Send selection")
**Problem:** The submission is empty (0 photos selected)
**Solution:**
* The client clicked "Send selection" without marking any photos
* Get in touch with the client and ask them to fill it in again
* Send detailed instructions
**Problem:** The client chose too few/too many photos
**Solution:**
* Get in touch with the client:
```
Hi! I received your selection - thank you!
You marked 65 photos, but the album fits 80.
You can add another 15 photos 😊
Fill in the form again with the full number.
Best regards!
```
**Problem:** I can't download the photos as a ZIP
**Solution:**
1. Check your internet connection
2. Try again in a few minutes
3. Download the photos one by one (slower, but it works)
4. Clear your browser cache
5. Try a different browser
**Problem:** I want to restore a deleted submission
**Solution:**
* Unfortunately, deletion is irreversible
* The client can fill in the form again
* For the future: make backups before deleting!
***
## Frequently asked questions
**How many submissions can one selection request have?**
No limit! You can receive dozens of submissions for a single selection request.
**Can I edit a client's submission?**
No. A submission is saved exactly as the client sent it. You can only view it or delete it.
**Does the client see their submission after sending it?**
The client gets a confirmation by email, but doesn't have access to a panel where they can preview their selection.
**How long are submissions stored?**
For the entire validity period of the gallery (1 year) or until you delete them manually.
**Can I export all submissions at once?**
Currently you have to download each submission separately. Consider copying the data into Excel for better organization.
***
## Related topics
* [Creating a selection](/en/selections/create-selection) - How to create the form
* [Sharing a selection](/en/selections/share-selection) - How to send the link to clients
## Overview
After a client submits a selection form, you receive a submission containing the chosen photos, plus the client's name and email. You can review all submissions, download the chosen photos, and manage them from the panel.
***
## Accessing submissions
**Instructions:**
1. Sign in to PixDeliver
2. Go to the **Dashboard**
3. Open the gallery
4. Click the **Selection requests** tab
5. Find the selection request in the list
6. Click the selection request's name or the **View submissions** button
**Result:** You'll see a list of all submissions for that selection request.
***
## The submissions list
### What you see in the list
For each submission you'll see:
**Basic information:**
* **Client's name** - provided in the form
* **Client's email** - the email address
* **Date and time** - when the form was submitted
* **Number of selected photos** - how many photos the client marked
**Actions:**
* **View details** - open the full preview of the selection
* **Download photos** - download the selected photos as a ZIP
* **Delete** - delete the submission
Submissions are sorted from newest to oldest. The most recent submissions are at the top of the list.
***
## Reviewing a submission
### Submission details
**Instructions:**
1. In the submissions list, click **View details**
2. A view with the full information opens
**What you'll see:**
**Client data:**
* Full name
* Email address
* Date and time of submission
**Selected photos:**
* Thumbnails of all the marked photos
* The number of selected photos
* File names
* The option to preview at full size (click a thumbnail)
**Actions:**
* Download all selected photos (ZIP)
* Download an individual photo
* Open a photo at full size
* Delete the submission
***
## Downloading the selected photos
### Download all as a ZIP
**Instructions:**
1. Open the submission details
2. Click the **Download selected photos (ZIP)** button
3. The system generates a ZIP archive (this may take a few seconds)
4. The archive downloads automatically
**What the archive contains:**
* All the photos chosen by the client
* In the compressed version (3840×3840 WebP)
* File names the same as the originals
* Format: `selection-[client-name]-[date].zip`
**Handy for producing the album:** Download the ZIP and you have all the photos chosen by the client in one place right away!
### Download an individual photo
**Instructions:**
1. In the submission preview, hover over a photo thumbnail
2. Click the **download** icon or right-click → **Save image as**
3. The photo downloads
***
## Notifications for new submissions
### Notification email
When a client submits a selection, you automatically receive an email:
**Subject:** "New photo selection from \[Name]"
**Content:**
```
A client has submitted a photo selection!
Client data:
Name: Anna Kowalska
Email: anna@example.com
Gallery: Anna & Tomek's Wedding
Selection: Choosing for the wedding album
Number of selected photos: 78
Submission date: May 15, 2024, 2:32 PM
[Button: View the selection in the panel]
```
### Turning off notifications
If you don't want to receive emails about submissions:
**Instructions:**
1. Go to **Settings** → **Notifications**
2. Uncheck **New photo selections**
3. Click **Save**
**Result:** You won't receive emails, but submissions will still be visible in the panel.
***
## Comparing submissions
### Multiple submissions from different people
If you've sent the form to multiple people (for example, a couple, or parents), you can compare their selections:
**Instructions:**
1. Open the submissions list
2. Click the first submission → **View details** → open it in a new tab
3. Click the second submission → **View details** → open it in a new tab
4. Switch between the tabs to compare
**Result:** You can see which photos each person chose.
### Finding shared choices
**Manual method:**
1. Note the numbers/names of the photos from the first submission
2. Compare them with the photos from the second submission
3. Mark the ones that repeat
**Example:**
* The bride chose: photos 1, 5, 7, 12, 15, 20
* The groom chose: photos 1, 7, 15, 18, 22, 25
* Shared: photos 1, 7, 15
***
## Multiple submissions from the same person
A client may fill in the form several times (for example, they changed their mind).
### Which submission should you use?
**The newest is usually the final one:**
* The list is sorted newest first
* The client probably changed their mind and sent a new selection
* Use the most recent submission
**Ask the client if in doubt:**
```
Hi Anna!
I received two submissions with photo selections:
- May 15, 2:32 PM - 78 photos
- May 16, 10:15 AM - 80 photos
Which one is final? 😊
Best regards!
```
***
## Exporting submission data
### List of selected photos (file names)
**Instructions:**
1. Open the submission details
2. Copy the file names of the selected photos
3. Paste them into Excel, a text editor, or another tool
**Example:**
```
IMG_0001.jpg
IMG_0005.jpg
IMG_0007.jpg
IMG_0012.jpg
...
```
**Use cases:**
* A list for the print lab
* Import into Lightroom (a collection)
* Documentation for the client
* Your own notes
***
## Deleting submissions
### When should you delete submissions?
✅ **Recommended:**
* The client sent multiple submissions and you've confirmed which one is final (delete the old ones)
* A test submission (one you sent yourself to check)
* A submission from the wrong person (accidental)
* After the project is finished and you no longer need the data
❌ **Don't delete:**
* Submissions that may still be needed
* Before downloading the photos/data
* If the project isn't closed
### How to delete a submission
**Instructions:**
1. In the submissions list, find the submission to delete
2. Click **Delete** or the trash icon
3. Confirm the deletion in the dialog
**Result:** The submission is permanently deleted.
**Deletion is irreversible!** Before deleting, make sure you have a copy of the data (downloaded photos, saved file names).
***
## Selection statistics
### Summary
In the selection view you'll see basic statistics:
**Number of submissions:**
* How many people submitted a selection
* Example: "Submissions: 3"
**Latest submission:**
* The date and time of the most recent submission
* Example: "Latest: May 16, 10:15 AM"
**Status:**
* Active / Inactive
* The expiration date (if set)
***
## A submissions workflow
### A typical process - Wedding album
1. **Creating a selection request**
* Title: "Choosing for the wedding album"
* Description: "Choose 80 photos"
* Deadline: May 31
2. **Sending the link**
* An email to the couple with the link and instructions
* A reminder a week before the deadline
3. **Receiving submissions**
* The bride submits a selection (78 photos) - May 25
* The groom submits a selection (80 photos) - May 27
* The bride submits a new selection (80 photos) - May 28
4. **Reviewing and comparing**
* You open the bride's latest submission (May 28, 80 photos)
* You open the groom's submission (May 27, 80 photos)
* You compare the selections
5. **Contacting the clients**
* You ask whether they have a shared selection or need your help
* You settle on the final list of 80 photos
6. **Downloading the photos**
* You download the final photos as a ZIP
* You start producing the album
7. **Closing the project**
* Once finished, you can delete the unneeded submissions (keeping the final one for your records)
***
## Integrating with a photographer's workflow
### Lightroom
**Creating a collection from the selected photos:**
1. Download the ZIP with the selected photos
2. Extract the archive
3. In Lightroom, create a new collection "Client's selection - \[Name]"
4. Drag the selected photos into the collection
5. Work only on those photos (retouching, export, etc.)
### Capture One
**A similar process:**
1. Download the selected photos
2. Create a new album "Selection - \[Name]"
3. Import the photos or mark the existing ones as selected
4. Export/retouch only the selected ones
### Excel / Google Sheets
**Managing orders:**
Create a sheet with columns:
```
| Client | Submission date | Number of photos | Status | Notes |
| Anna K | 2024-05-28 | 80 | In production | Premium album |
| Tomek N | 2024-05-27 | 80 | Waiting | Compare with Anna's selection |
```
***
## Tips and best practices
✅ **Recommended:**
* Download the photos right after receiving a submission
* Keep a copy of the submission (a screenshot or an export of the file names)
* Compare submissions if you have several from different people
* Ask clients to confirm the final selection
* Use the latest submission if the client sent several
* Respond to submissions quickly (a confirmation of receipt)
* Only delete unneeded/test submissions
❌ **Avoid:**
* Relying on memory alone (download and save!)
* Deleting submissions before the project is finished
* Ignoring multiple submissions from the same person (ask!)
* Assuming the first submission is final
* Losing track of submission information
***
## Troubleshooting
**Problem:** I don't see any submissions, even though the client submitted a selection
**Solution:**
1. Check the SPAM folder in your email - the notification may have ended up there
2. Refresh the page in the panel (Ctrl+F5)
3. Check that you're in the right gallery and selection
4. Ask the client for a screenshot confirming the submission
5. Ask the client whether they filled in the form all the way (clicked "Send selection")
**Problem:** The submission is empty (0 photos selected)
**Solution:**
* The client clicked "Send selection" without marking any photos
* Get in touch with the client and ask them to fill it in again
* Send detailed instructions
**Problem:** The client chose too few/too many photos
**Solution:**
* Get in touch with the client:
```
Hi! I received your selection - thank you!
You marked 65 photos, but the album fits 80.
You can add another 15 photos 😊
Fill in the form again with the full number.
Best regards!
```
**Problem:** I can't download the photos as a ZIP
**Solution:**
1. Check your internet connection
2. Try again in a few minutes
3. Download the photos one by one (slower, but it works)
4. Clear your browser cache
5. Try a different browser
**Problem:** I want to restore a deleted submission
**Solution:**
* Unfortunately, deletion is irreversible
* The client can fill in the form again
* For the future: make backups before deleting!
***
## Frequently asked questions
**How many submissions can one selection request have?**
No limit! You can receive dozens of submissions for a single selection request.
**Can I edit a client's submission?**
No. A submission is saved exactly as the client sent it. You can only view it or delete it.
**Does the client see their submission after sending it?**
The client gets a confirmation by email, but doesn't have access to a panel where they can preview their selection.
**How long are submissions stored?**
For the entire validity period of the gallery (1 year) or until you delete them manually.
**Can I export all submissions at once?**
Currently you have to download each submission separately. Consider copying the data into Excel for better organization.
***
## Related topics
* [Creating a selection](/en/selections/create-selection) - How to create the form
* [Sharing a selection](/en/selections/share-selection) - How to send the link to clients